

Connecting to Your Linux Instance from Windows Using PuTTY

The following instructions explain how to connect to your instance using PuTTY, a
free
SSH client for Windows. If you receive an error while attempting to connect to
your instance,
see Troubleshooting Connecting
to Your Instance.
After you launch your instance, you can connect to it and use it the way that you'd
use a computer sitting in front of you.
Note
After you launch an instance, it can take a few minutes for the instance to be ready
so that you can connect to it.
Check that your instance has passed its status checks. You can view this information
in the Status Checks
column on the Instances page.
Prerequisites
Before you connect to your Linux instance using PuTTY, complete the following
prerequisites:
Verify the general prerequisites for connecting to your
instance.
For more information, see General Prerequisites for Connecting to Your
Instance.
Install PuTTY on your local computer.
Download and install PuTTY from the PuTTY
download page
- . If you already have an older version of PuTTY
installed, we recommend that you download the latest version. Be sure to
install the entire suite.
Convert your private key using PuTTYgen
Locate the private key (.pem file) for the key pair that you specified when
you launched the instance. Convert the .pem file to a .ppk file for use with
PuTTY.
For more information, follow the steps in the next section.
Convert Your Private Key Using PuTTYgen
PuTTY does not natively support the private key format for SSH keys. PuTTY provides
a
tool named PuTTYgen, which converts keys to the required format for PuTTY.
You must convert your private key (.pem file) into this format (.ppk file) as
follows in order to connect to your instance using PuTTY.
To convert your private key
From the Start menu, choose All Programs,
PuTTY, PuTTYgen.
Under Type of key to generate, choose
RSA.

If you're using an
older
version of PuTTYgen, choose SSH-2
RSA.
Choose Load. By default, PuTTYgen displays only
files with the extension.ppk. To locate your
.pemfile, select the option to display files of
all types.

Select your.pemfile for the key pair that you specified when you
launched your instance and choose Open. Choose
OK.
To save the key in the format that PuTTY can use, choose Save private
key. PuTTYgen displays a warning about saving the key
without a passphrase. Choose Yes.
Note
A passphrase on a private key is an extra layer of protection. Even if your private
key
is discovered, it can't be used without the passphrase. The downside to
using a passphrase is that it makes automation harder because human
intervention is needed to log on to an instance, or
to
copy files to an instance.
Specify the same name for the key that you used for the key pair (for
example,my-key-pair). PuTTY automatically adds the
.ppkfile extension.
Your private key is now in the correct format for use with PuTTY. You can now
connect to your instance using PuTTY's SSH client.
Connecting to Your Linux Instance
Use the following procedure to connect to your Linux instance using PuTTY. You need
the
.ppkfile
that
you created for your private key. If you receive an error while
attempting to connect to your instance, see Troubleshooting
Connecting to Your Instance.
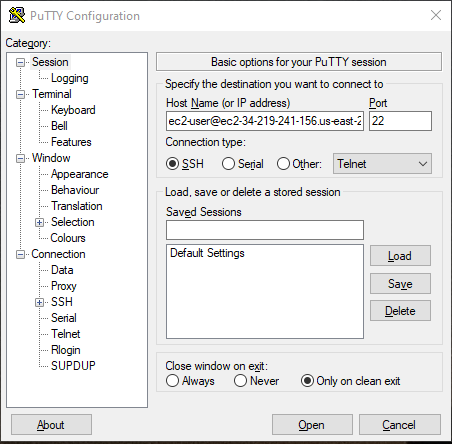
To connect to your instance using PuTTY
Start PuTTY (from the Start menu, choose All Programs,
PuTTY, PuTTY).
In the Category pane, choose Session and
complete the following fields:
In the Host Name box, enter
user_name@public_dns_name
(see Get
Information About Your Instance for how to get the public
DNS name of the instance). Be sure to specify the appropriate user
name for your AMI. For example:
For Amazon Linux 2 or the Amazon Linux AMI, the user name isec2-user.
For a CentOS AMI, the user name iscentos.
For a Debian AMI, the user name isadminorroot.
For a Fedora AMI, the user name isec2-userorfedora.
For a RHEL AMI, the user name isec2-userorroot.
For a SUSE AMI, the user name isec2-userorroot.
For an Ubuntu AMI, the user name isubuntu.
Otherwise, ifec2-userandrootdon't work, check with the AMI provider.
(IPv6 only) To connect using your instance's IPv6 address, enter
user_name@ipv6_address.
Be sure to specify the appropriate user name for your AMI. For
example:
For Amazon Linux 2 or the Amazon Linux AMI, the user name isec2-user.
For a CentOS AMI, the user name iscentos.
For a Debian AMI, the user name isadminorroot.
For a Fedora AMI, the user name isec2-userorfedora.
For a RHEL AMI, the user name isec2-userorroot.
For a SUSE AMI, the user name isec2-userorroot.
For an Ubuntu AMI, the user name isubuntu.
Otherwise, ifec2-userandrootdon't work, check with the AMI provider.
Under Connection type, select
SSH.
Ensure that the Port value is 22.
(Optional) You can configure PuTTY to automatically send 'keepalive' data at regular
intervals to keep the session active. This is useful to avoid disconnecting
from your instance due to session inactivity. In the
Category pane, choose
Connection, and then enter the required interval in
the Seconds between keepalives field. For example, if
your session disconnects after 10 minutes of inactivity, enter 180 to
configure PuTTY to send keepalive data every 3 minutes.
In the Category pane, expand Connection, expand
SSH, and then choose Auth.
Complete the following:
Choose Browse.
Select the.ppkfile that you generated for your key pair and
choose Open.
(Optional) If you plan to start this session again later, you can save the session
information for future use. Under Category,
choose Session, enter a name for the session in
Saved Sessions, and then choose
Save.
Choose Open.

If this is the first time you have connected to this instance, PuTTY displays a
security alert dialog box that asks whether you trust the host to which you
are connecting.
(Optional) Verify that the fingerprint in the security alert dialog box matches the
fingerprint that you previously obtained in (Optional) Get the Instance Fingerprint. If these fingerprints
don't match, someone might be attempting a "man-in-the-middle" attack. If
they match, continue to the next step.
Choose Yes. A window opens and you are connected to
your instance.
Note
If you specified a passphrase when you converted your private key to
PuTTY's format, you must provide that passphrase when you log in to
the instance.
If you receive an error while attempting to connect to your instance, see Troubleshooting
Connecting to Your Instance.
Transferring Files to Your Linux Instance Using the PuTTY Secure Copy
Client
The PuTTY Secure Copy client (PSCP) is a command line tool that you can use to transfer
files between your Windows computer and your Linux instance. If you prefer a
graphical user interface (GUI), you can use an open source GUI tool named WinSCP.
For more information, see Transferring Files to Your Linux Instance Using WinSCP.
To use PSCP, you need the private key you generated in Convert Your Private Key Using PuTTYgen. You also need
the public DNS address of your Linux instance.
The following example transfers the fileSample_file.txtfrom the C:\ drive on
a Windows computer to theec2-userhome directory on an Amazon Linux
instance:
(IPv6 only) The following example transfers the filepscp -i C:\path\my-key-pair.ppk C:\path\Sample_file.txt ec2-user@public_dns:/home/ec2-user/Sample_file.txtSample_file.txtusing the instance's IPv6 address. The IPv6 address must be enclosed in square brackets ([]).
pscp -i C:\path\my-key-pair.ppk C:\path\Sample_file.txt ec2-user@[ipv6-address]:/home/ec2-user/Sample_file.txtTransferring Files to Your Linux Instance Using WinSCP
WinSCP is a GUI-based file manager for Windows that allows you to upload and transfer files to a remote computer using the SFTP, SCP, FTP, and FTPS protocols. WinSCP allows you to drag and drop files from your Windows machine to your Linux instance or synchronize entire directory structures between the two systems.
To use WinSCP, you need the private key that you generated in Convert Your Private Key Using PuTTYgen. You also need the public DNS address of your Linux instance.
- Download and install WinSCP from http://winscp.net/eng/download.php
- . For most users, the default installation options are OK.
- Start WinSCP.
- At the WinSCP login screen, for Host name, enter the public DNS hostname or public IPv4 address for your instance.
(IPv6 only) To log in using your instance's IPv6 address, enter the IPv6 address for your instance.
- For User name, enter the default user name for your AMI.
- For Amazon Linux 2 or the Amazon Linux AMI, the user name is
ec2-user.
- For a CentOS AMI, the user name is
centos.
- For a Debian AMI, the user name is
adminorroot.
- For a Fedora AMI, the user name is
ec2-userorfedora.
- For a RHEL AMI, the user name is
ec2-userorroot.
- For a SUSE AMI, the user name is
ec2-userorroot.
- For an Ubuntu AMI, the user name is
ubuntu.
- Otherwise, if
ec2-userandrootdon't work, check with the AMI provider.
- For Amazon Linux 2 or the Amazon Linux AMI, the user name is
- Specify the private key for your instance. For Private key, enter the path to your private key, or choose the "..." button to browse for the file. To open the advanced site settings, for newer versions of WinSCP, choose Advanced. To find the Private key file setting, under SSH, choose Authentication.
Here is a screenshot from WinSCP version 5.9.4:
WinSCP requires a PuTTY private key file (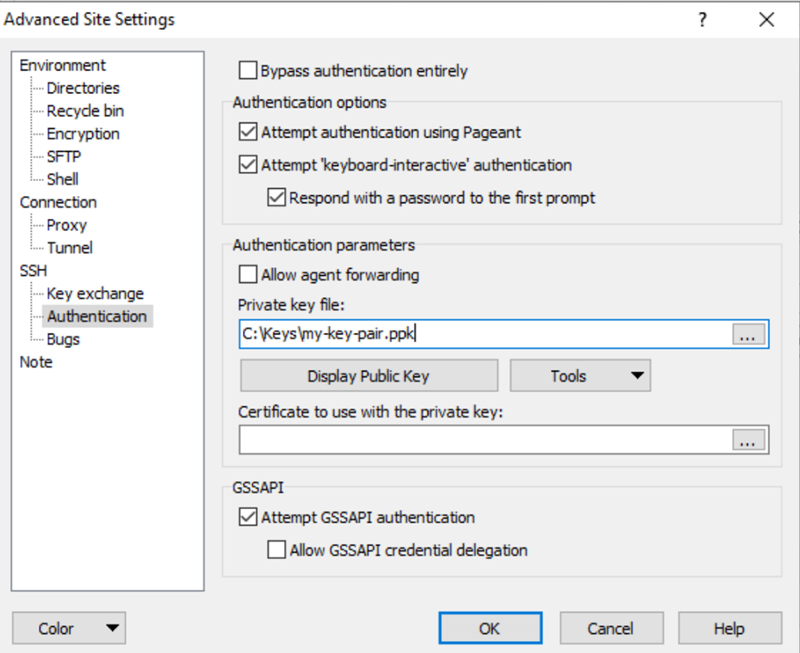
.ppk). You can convert a.pemsecurity key file to the.ppkformat using PuTTYgen. For more information, see Convert Your Private Key Using PuTTYgen.
- (Optional) In the left panel, choose Directories. For Remote directory, enter the path for the directory to which to add files. To open the advanced site settings for newer versions of WinSCP, choose Advanced. To find the Remote directory setting, under Environment, choose Directories.
- Choose Login. To add the host fingerprint to the host cache, choose Yes.

- After the connection is established, in the connection window your Linux instance is on the right and your local machine is on the left. You can drag and drop files directly into the remote file system from your local machine. For more information on WinSCP, see the project documentation at http://winscp.net/eng/docs/start .
If you receive a "Cannot execute SCP to start transfer" error, you must first install scp on your Linux instance. For some operating systems, this is located in the
openssh-clients package. For Amazon Linux variants, such as the Amazon ECS-optimized AMI, use the following command to install scp. [ec2-user ~]$ sudo yum install -y openssh-clients
0 Comments